Now that we were able to obtain the Google API key last time, there is only one more setting left. Finally, 2. Link your remote controller and GlobeXplore (set the axis) and you are done. First, start GlobeeXplore. Turn on the power to your remote controller and then connect it to the PC (USB).下記は起動直後の GloboeXplore 画面です。You can see the GloboeXplore screen below after startup.
GlobeXlpore screen
Click the “Settings” button in the middle of the screen. Move to the screen below.
GlobeXlpore setting screen
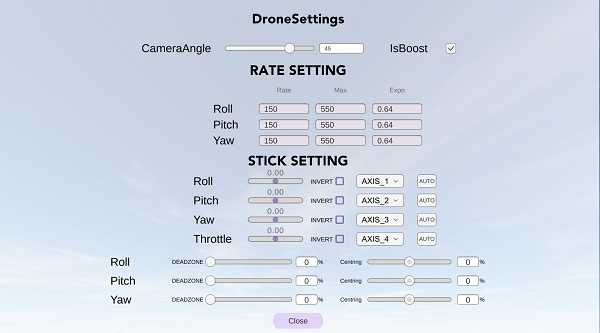
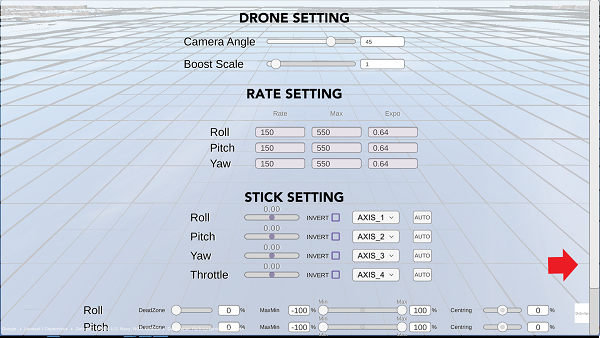
All you have to do is set the red boxed area of this screen shown below to match your controller, and you’re almost done.
GlobeXlpore setting screen
Specifically, allocate axes AXIS_1 to AXI_4 to Roll, Pitch, Yaw, and Throttle.
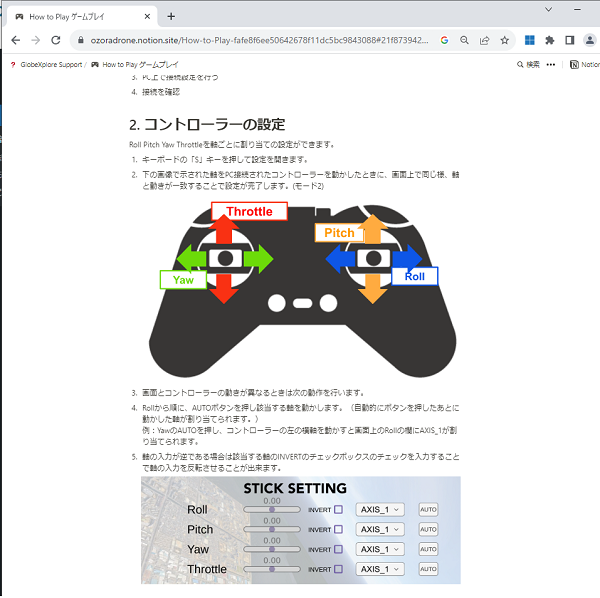
Move the screen to “2. Controller settings”. There is a picture of the controller.
GlobeXlpore support page
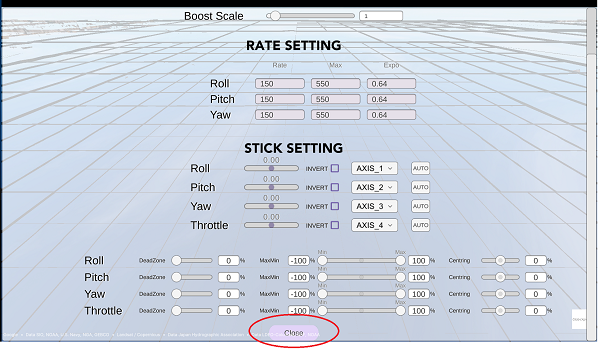
In GlobeXplore, the controller setting seems to be based on mode 2.( If you don’t know mode 2 , please refer ドローンシミュレーターで飛ぶ (3)/難しい操作用語はこう理解! (Sorry, Japanese only now..) As explained above, it is better to check and set the AXIS assignment using the “AUTO” button. In my case, I set it up by trial and error at first, but soon I couldn’t figure out which assignment(allocation) was correct. In particular, Roll and Yaw positions are hard to tell apart for amateurs when you fly highly in the air. So, I recommend to use the “AUTO” button to move and check your controller before setting the axis. By the way, my setting is below. AXIS is 1, 2, 3, 4 from the top, and there is no INVERT check. (GlobeXplore version 1.3)
I saw different settings on other sites , so it doesn’t seem to be the same for all. And, this setting seems to change depending on the version of GlobeXplore, so operate the controller by yourself and set it correctly.
GlobeXlore setting screen
The settings are now complete. Click the “Close” button and return to the initial screen.
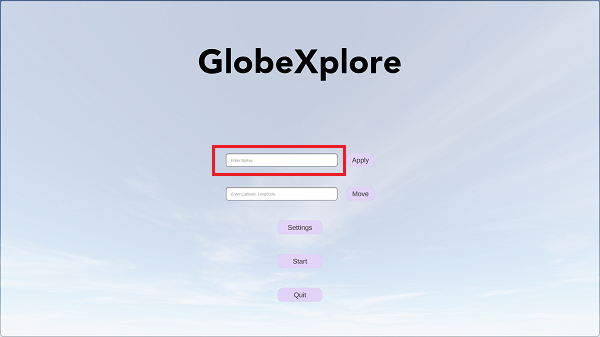
GlobeXplore initial screen
Paste the API key you obtained last time into the red box on the screen and click ‘Apply’ button. All you have to do is input the position (coordinate) you want to fly in the text box below and you’re ready to go. How to check and set the coordinates is described in “5. moving the MAP” on the support page, so I omit it here. Did it! The settings are now complete. I guess it wasn’t that difficult even for beginners.
Now you’re all set to fly around the world. Let’s fly wherever you like! Next time, I will introduce the actual flying scene. Please forgive me for the poor operation.
*Additional note (updated on November 22, 2023) The size of the settings screen has been larger since ver1.33, so it can’t be seen on one screen (Windows version).It may be a little difficult to find to get to the bottom of the screen. There is a vertical scroll bar on the right side(see image below ‘arrow’).
GlobeXplore setting screen(after ver1.33)
If you drag this scroll bar down with your mouse, ‘close button’ will also appear and you can return to the original screen.
Actually, I’m also a little confused, so please be careful. In addition, it is recommended to use ver 1.34 rather than 1.33. Ver 1.34 is very comfortable!